The General Tab in the Settings Area of the EnterYourHours.com system contains settings that affect multiple aspects of the EnterYourHours.com system, or settings that didn't belong in any of the other Settings Area Tabs. If you have not already done so, you can access the general settings screen by clicking the Settings Icon  , and then clicking the General Tab.
Settings Sub Menu with General Selected:

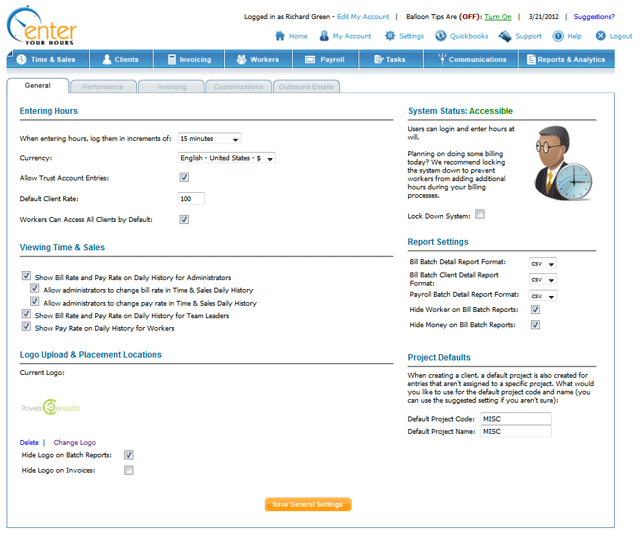
Below is a screenshot of the General Settings Screen. There are six sections: Entering Hours, Viewing Time & Sales, Logo Upload & Placement Locations, System Status, Report Settings and Project Defaults. Each section is explained below.
General Settings Page:

Entering Hours
When entering hours, log them in increments of: This setting determines what increment you and your workers can choose from when entering hours. The options are: 5 minute, 6 minute, 10 minute, 15 minute, 30 minute, 60 minute, or freely typed. If you choose freely typed, then on the Time & Sales Screen, all users of the system will be presented with a free-type entry box, instead of a drop-down.
Currency: This is the option that allows you to change the currency that appears on your invoices, bills and reports.
Allow Trust Account Entries: This is a feature mostly used by the legal community. You can view our chapter on trust accounting here.
Default Client Rate: This is the rate that will be used when a new client is created. Be sure to enter the rate when you create a new client, if you do not want to use the default rate.
Workers can Access all Clients by Default: This setting when left checked allows all clients to be seen by default. If the setting is unchecked all clients will be blocked by default and must be configured manually. You can configure and learn more about worker access by visiting the Blocking/Unblocking Clients from Workers help page.

Viewing Time & Sales
Show Bill Rate and Pay Rate on Daily History for Administrators: This setting allows administrators to see the bill and pay rate on the history section of the Time & Sales screen. The two options below it control whether or not an administrator can edit the bill and pay rate directly from the History section.
Show Bill Rate and Pay Rate on Daily History for Team Leaders: This setting allows Team Leaders to see the bill and pay rate on the history section of the Time & Sales screen.
Show Pay Rate on Daily History for Workers : This setting allows Workers to see the pay rate on the history section of the Time & Sales screen.
Logo Upload & Placement Locations
This section is where you upload your logo. Your logo will be displayed on your company's login page, and potentially on your batch reports and on your invoices. Select the checkboxes below based on where you want your logo to appear.
The option to hide your logo on your invoices can also be set in the Invoice Settings Tab. See
Invoice Settings for more information.
If this is the first time uploading your logo, click the Browse button, and locate your logo from your computer. Once you've located your logo file, click the Save Settings button to upload it.
If you have already uploaded your logo, you can click the Delete or Change Logo links to remove or change your logo.
System Status
If you want to lock-down your system so workers cannot enter Time & Sales data, use this option.
Report Settings
Bill Batch Detail Report Format: Select this option to determine whether your Bill Batch Reports are created as an Adobe PDF file or as an excel file.
Bill Batch Client Detail Report Format: Select this option to determine whether your Bill Batch Client Detail Reports are created as an Adobe PDF file or as an excel file.
Payroll Batch Detail Report Format: Select this option to determine whether your Payroll Batch Detail Detail Reports are created as an Adobe PDF file or as an excel file.
Hide Worker on Bill Batch Reports: This option removes the worker column on the bill batch reports. This options is important if you don't want your client to know which particular worker worked on a particular task.
Hide Money on Bill Batch Reports: This option removes all dollar figures from the bill batch report. This options is important if you don't want your client to associate a dollar figure with a certain task.
Default Projects
Default Project Code/Name: This setting pertains to when creating a client, a default project is also created for entries that aren't assigned to a specific project. By default this setting is set to MISC but you can customize it to your preference.