Invoices can be customized in a variety of ways. You can configure how your time & sales are grouped and sub-totaled, and how balances and payment information is displayed. You can also display your logo, alter how your detail is displayed, and many other elements. Below is a section-by-section guide to all seven parts of the Invoice Setting Screen. If you have not already done so, you can access the invoice settings screen by clicking the Settings Icon , and then clicking the Invoicing Sub Menu.
Settings Sub Menu with Invoicing Selected:

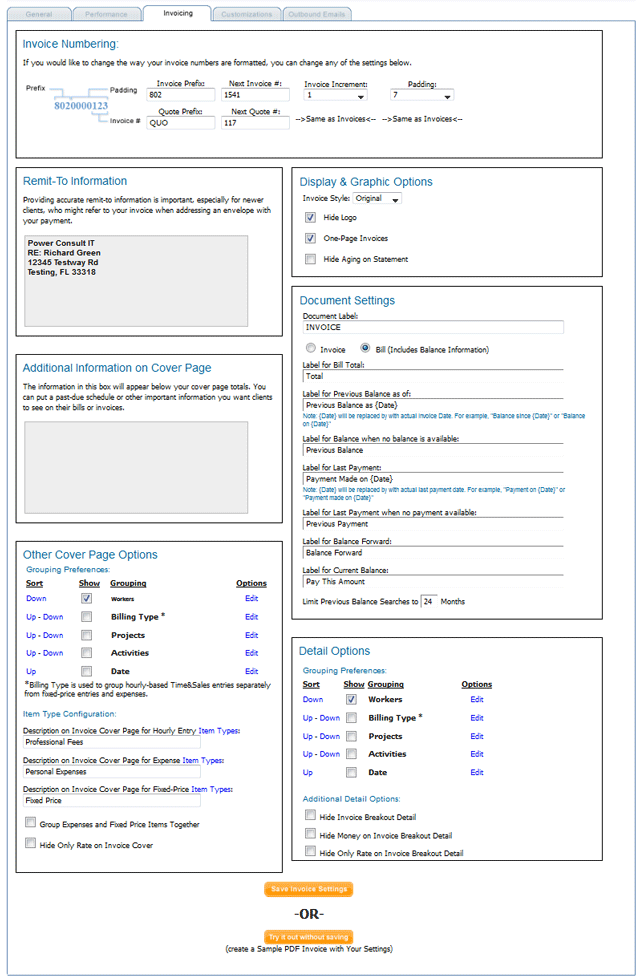
Below is a screenshot of the Invoice Settings Screen. There are seven sections: Invoice Numbering, Remit-To Information, Display and Graphics Options, Additional Information on Cover Page, Document Settings, Other Cover Page Options, and Detail Options. There is also a pop up screen which we'll refer to as Invoice Group Formatting Options at the bottom. Each section is explained below.
Invoice Settings Page:

Invoice Numbering
Configure the pattern that EYH uses to determine your invoice numbering. There's a small graphic on the left hand side that illustrates how each setting affects the pattern. You can also configure how the system numbers your quotes.
Remit-To Information
This is your address information that will appear at the top of your invoices. Make sure to type this in carefully. New clients will often use this address when they send you payment
Display & Graphics Options
Invoice Style: The Invoice Style allows you to set the "look and feel" of the invoice. Essentially, each choice is a different invoice template. Choosing a different Invoice Style does not offer alter the data or grouping, but rather elements like borders, fonts, positioning, etc. We will continue to add new offerings. At the time of this writing, there are three different templates. The Original Invoice Style was our first template. We've added a Clean Style which uses less borders and has a more "Web" look to it. The Standard Style is very similar to the Original, in it's corporate, "accounting software" feel, but we've added some consistencies between the cover and detail section and have lined up columns a little differently. If you prefer something like the Standard or Original Style, we would recommend choosing the Standard Style.
Hide Logo: If you used the logo upload option under the General Settings Screen, you can select this option to block your logo from appearing on your invoices.
One-Page Invoices: Dubbed by some as our "green" option because it saves on paper, this option will start the detail section immediately below the cover section without applying a page break.
Hide Aging on Statement: Check off this option if you don't want aging buckets to appear at the bottom of your statements.
Additional Information on Cover Page
This information will appear below your cover page totals. You can input any information you want for your clients to see on their bills or invoices.
Document Settings

Document Label: This text box allows you to change the title that appears at the top of your Invoice or Bill.
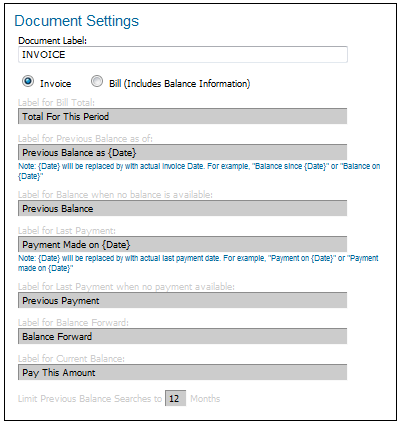
The screenshot above shows the options for an Invoice/Bill. The text fields will not be editable until the document type is set to bill.
: Editable field for the amount currently due that does not include any previous balances owed by the customer.
Label for Previous Balance: The text in this field can be changed to your preference but must always contain the {date} tag to ensure the bill is systematically dated.
Label for Balance when no balance is available: Will become visible if no previous balance is available for the customer.
Label for Last Payment: Field for last payment received. {Date} tag must remain in the text field.
Label for Last Payment when no payment available: Text will become visible in the case that no previous payments have been made.
Label for Balance Forward: Balance forward represents the amount the client owed before the invoice was cut. The Current Balance is the balance forward plus the new invoice total.
Label for Current Balance: Editable title for the current open balance that the customer owes.
Limit Previoius Balance Searches: This field allows for the time frame of previous records to be altered. The default is set to 12 months and can be altered to fit your monthly time frame preference.
Other Cover Page Options
The cover page is the first page of the invoice and contains aggregated information for you client, as well as other standard information such as remit-to address, date, invoice number, etc.
Grouping Preferences: This is a very important option, based on the level of detail you would like to provide your clients. Whether you call it segmenting, grouping, sorting, or categorizing your data, it all comes down to how you wish to organize your billing when presenting it to a client on an invoice. Every billable entry is either an hourly entry, a fixed-price item, or an expense (also refered to as an Item Type). Also, every billable entry is attributed to a particular worker making the entry or to a worker that an administrator assigns it to when entering it. Also, every billable entry has a date, and potentially a project or activity. These five categories can be used to organize the way your data is broken down on your invoice. Additionally you can edit each group's formatting options by clicking the Edit link next to the group you wish to edit. See below for detailed instructions on group formatting options. You can experiment with these settings by making selections and then clicking the View a Sample PDF Invoice with Your Settings link.
Description on Invoice Cover Page for Hourly Entries: All invoices break down your billing by hourly billing, fixed-price billing, and potentially expense reimbursements (see below for how to combine fixed-price sales with expense reimbursements). On the invoice cover, the line item that represents your hourly billing needs a description, which you can provide here.
Description on Invoice Cover Page for Expenses: All invoices break down your billing between by billing, fixed-price billing, and potentially expense reimbursements (see below for how to combine fixed-price sales with expense reimbursements). On the invoice cover, the line item that represents your reimbursable expenses needs a description, which you can provide here.
Description on Invoice Cover Page for Fixed-Price Items: All invoices break down your billing between by billing, fixed-price billing, and potentially expense reimbursements (see below for how to combine fixed-price sales with expense reimbursements). On the invoice cover, the line item that represents your fixed-price items needs a description, which you can provide here.
Group Expenses and Fixed Price Items Together: If you wish to lump all fixed-price items together, including reimbursable expenses, then you should select this option. For example, this will put an entry like a reimbursable plane ticket together with the sale of a pre-negotiated fixed-price service offering.
Additional Information on Invoice Cover Page: The information you put in this field will show up in the bottom left corner of your coverage page. Often this area is used for payment terms or legal disclaimers.
Detail Options
The detail section of the invoice displays all of your Time & Sales data.
Hide Invoice Breakout Detail: Select this option to hide the Time & Sales detail completely.
Hide Money on Invoice Breakout Detail : Select this option to remove dollar amounts from the Time & Sales detail. This feature is useful if you want to avoid having clients associate a specific price with each individual hourly entry.
Grouping Preferences: This is the same as the Grouping Preferences under the Cover Page Options (see above) but in the detail section, every Time & Sales entries is shown. Keep in mind that you can choose a different set of grouping for the cover page than for the details page.
Invoice Group Formatting Options

By clicking on the edit link you will be able to make the following changes to any group section of the invoice:
Data Header / Detail Area: You can alter the background color of the header and detail area below the header for the group.
Totals Section: The totals section is essentially the footer for the group and contains the sum of hours and dollars. You can alter the background color as well as choose to hide the totals section completely.
Keep in mind that every group can be configured with it's own background colors, etc. The top will indicate what group your on.