Activity Integration with Quickbook
We are going to assume that you've visited our Quickbooks Support Page and
followed the steps there to get started. This will mean that you've run at least your first update using the
Quickbooks Web Connector. It's also a good idea to take a look at the
Guide to Integrating Your Account Data with Quickbooks, which provides an
overview to the rest of the Quickbooks Integration Guides on this site.
The Standard Integration with Quickbooks Guide
will also cover some of the basics which aren't referenced in this guide.
Configuring your invoices to group your billing by activity can be especially useful if you charge different prices for
different services. This is one scenario where there is a strong probability that you will have specific Quickbooks Items
for the different services. For this example, we are creating three Activities: Communication (Phone and Email), Consultation,
and Paperwork. The first activity, Communication (Phone and Email), might seem like a cumbersome name, but keep in mind that the
way it's named in your EnterYourHours.com account, is how it will appear on the invoices. More on that later.
The first step is to create EYH Billing Categories for your Activities and map them to the respective Quickbooks Items.
Below you can see that we've created three EYH Billing Categories for our Activities. Further, you can see that we've mapped them
to the respective three Quickbooks Items. It's simple to create and map EYH Billing Categories to Quickbooks Items, which is
accomplished in the Quickbooks Configuration Area (click the  icon to access
it). You can skim the Guide to Integrating Your Account Data with Quickbooks
for a quick how-to, or check out the Project Integration with Quickbooks Guide,
which contains a more detailed explanation.

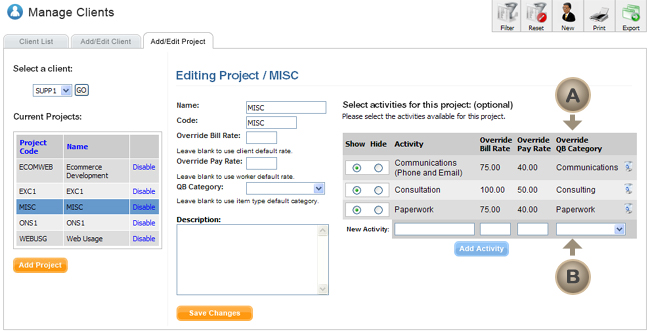
Next we need to assign the EYH Billing Category to the Activities. Activities are created under a project,
but after you create an Activity for the first time, it can be made active for any other project by clicking
the Show radio button next to the Activity in the project edit screen. Below you will see we've created
three Activities, Communications (Phone and Email), Consultation, and Paperwork, and we've assigned a different
billing rate to each, which can be seen from the QB Override Category column in the Activity list
( ). The QB Override Category is chosen when you
add a new Activity (
 ). In the screenshot below,
we've already added the Activities, and made them active for the MISC project, which is the default project that
gets created with any new client.

In this scenario, we are going to assume that you've configured your invoices to group on Activities.
In the screenshot below of the Invoice sub-tab of the Settings Area, you can see that we are grouping our
invoices on Activities.

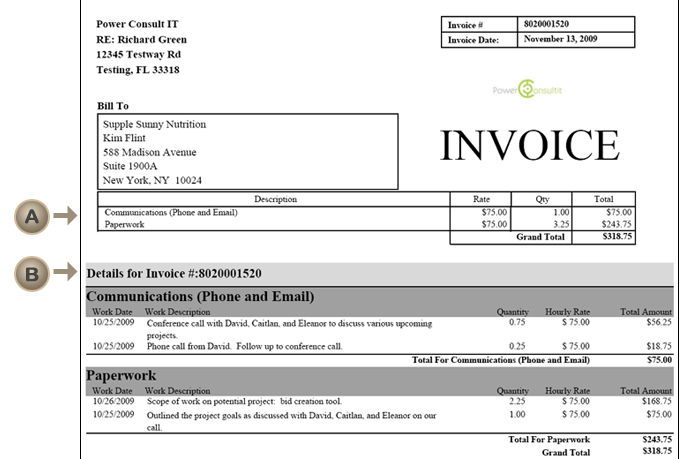
For this invoice, we made four entries in the Time & Sales screen, all of which were hourly charges.
Two of the entries were assigned the Communication (Phone and Email) Activity, and the other two
were assigned the Paperwork Activity. If you aren't sure how to enter time and expenses, see
the Time & Sales Screen help section.
Below is a screenshot of the invoice we created. Notice that the cover sheet area splits out the totals by
Activity( ). You can also see the Activity
is split out in the detail section (
 ).
If you would like to know how to create an invoice from your Time & Sales entries, see
the help topic Overview of the Billing and Invoicing Process.

All that's left to do is to mark the invoice for transfer and run the Quickbooks Web Connector.
Below is a screenshot of the invoice as it appears in Quickbooks. Compare it to the EnterYourHours.com invoice.

For more information on getting started with the Quickbooks Web Connector, visit our Quickbooks Support Page.
We hope you've found this introductory guide useful. If you would like to schedule a walkthrough, you can do so by opening a support ticket with a phone number and a time you would like to be reached.
Support tickets are available for free trial account holders as well.