There are two methods for creating an Invoice.
Creating an Invoice from a Bill Batch
Most likely, you will want to create an invoice from the hours and fixed-price items you have already entered. First you will need to create a Bill Batch for these items. If you are not sure how to create a Bill Batch, don't worry. It's a quick an easy process, and if you have no patience for long help manuals and you just want to get to invoicing right away, read any of the quick how-to topics in the Bill Batches section. Once you have created a bill batch, click the plus sign next to the bill batch in the bill batches tab of the accounting center. Click the create invoice link in the command column for the client you wish to invoice.
As your invoice is being created, you will see a picture signaling that the creation is in progress. normally it takes no more than a few seconds for a invoice to generate. Once the invoice is created, the command column in the bill batches tab for that client will show the title invoiced, and there will be four new commands available:
View/Save: view the pdf or excel invoice, or save it to your hard-drive. Any administrator can control whether invoices are created in adobe� pdf or microsoft excel� format in the general tab of the settings screen.
learn more.
Edit: Make changes to the invoice.
learn more.
Delete: Delete the invoice.
Enter payment: Record a new payment for the client that you invoiced.
learn more.
Send email: Send the invoice to your client via email.
learn more.
The invoice will also appear in the invoices tab as well. For more information about the invoices tab, see the working with the invoice list topic.
Creating an invoice from scratch
The second way to create an invoice is to do so from scratch. You can access the new invoice form by clicking the  button in the Accounting Center toolbar. The new invoice form is shown below:
New Invoice Form
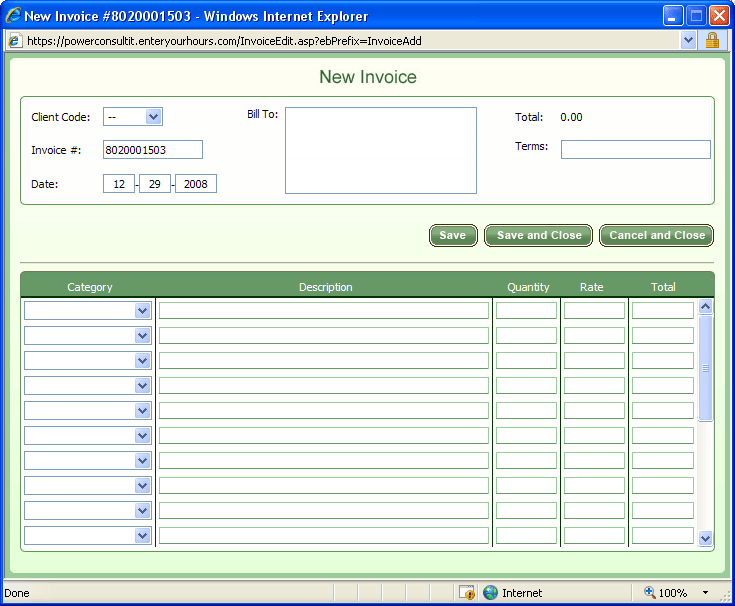
At the very least you will need to pick a client code from the drop down list at the top left. Since you are a creating an invoice from scratch, the total will be zero until you start filling in invoice lines. There are no particular requirements for how you add your invoice lines. You can pick any billing category from the drop down list. These are mostly needed for quickbooks integration. If your desired category isn't in the list, you can add more categories in the quickbooks configuration area by clicking the quickbooks icon at the top. You can type any invoice line description up to 80 characters. Type in a quantity and rate, and the line total will be automatically calculated, and the invoice total in the top right corner will be updated. You can skip lines and the spacing will show up on the printable invoice. Once you are finished with the invoice, click either the save button or the save and close button to save your invoice. The invoice will now appear in the invoices tab of the Accounting Center. From there you can view, edit, delete, or send your invoice via email.